Instant Pot Korean Braised Short Ribs (galbi jjim)

PICTURE TO COME. DAMMIT, I FORGOT TO TAKE A PICTURE.

I love my instant pot. It is groundbreaking, even more so than the microwave–because instead of reheating things, it MAKES things. I love braised meats, but don’t often make it, because WHO NEEDS TO WAIT 4 HOURS FOR FOOD? The instant pot is a game changer–braised meats are ready in about an hour. BOOM.

So with that–I’m going to share the Instant Pot version of my galbi jjim with you.

I’ve made it several times–twice with Whole30 adjustments (coconut aminos instead of soy sauce, and minced apples instead of sugar) and twice the way I always do. Both delicious. It comes out a bit soupy–but you can easily remedy that by adding corn starch or potato starch at the end, and letting it sit for awhile.

Serve over rice (of course–unless you’re WHOLE30’ing it, in which case…just eat it).

Recipes follows after the jump…
Continue reading

Toddler Loves

photo (6)

I’ve posts on quick and easy meals for new moms–ones that can be prepped with minimal (or no) chopping, and minimal time in front of a stove or oven. I had a baby in a sling at the time. I was exhausted. But I had to eat. And I barely did. I had some horrible postpartum depression that kept me from taking care of myself. I lost thirty-five pounds in four months.

The quick and easy meals I provided are really for mom (and dad)–especially those who don’t have much support. I was starving and exhausted and the highlight of those first few months was when I bought myself a rice cooker. I was ELATED–hot food at will! This, after burning pot after pot of rice on the stove, because I would forget that I set the water to boil, or have to tend to my baby.

Meanwhile, the baby grew up and started eating solid food. First there were purées, which don’t have many requirements in the way of recipes (steam/roast, maybe add an herb or spice, then purée–freeze in ice cube trays for subsequent meals).

I got treatment for my PPD. My baby is now a full fledged toddler. She turned one last year, and she is now eating solids full time. She’s exploring the world of food and developing her opinions on textures and flavors and temperature. And I’d like to share some of the food she likes to eat, here. And share those recipes. Because sometimes we’re at a loss for what to cook. And the baby canNOT eat plain pasta every damn day. Or maybe she can? Because it sure looks like she is? Oh boy.

Some caveats: Toddler P loves spice. I’m not sure whether it’s because I purposely ate as many spicy foods as I could during my second and third trimesters to build her palate in utero (yes, I did that), or because I added spices in her purées, or because that’s just how she is. But she doesn’t mind a pinch of cayenne in a pot of soup. And she’ll eat kimchi, even without rinsing. She likes spicy beef jerky and spicy chicharrones (she’ll eat one, say “HOT!” and then hold out her hand and ask, “More?”). I’ll note where you can take the spice down.

Some of the recipes already on this site that Toddler P likes:

Quick and Easy Kimchi Fried Rice for New Moms

"New mom kimchi fried rice." Using precut frozen peas + carrots as veg. Also has some finely chopped onion (optional) as well as cabbage kimchi (not as optional). Less than 15 min to make if u have the rice ready in a rice cooker.

This kimchi fried rice is in no way “authentic.” I’m Korean, but I’m going to bet that there are non-Koreans who can cook more “authentic” fried rice than this particular recipe. But it’s just the way I make kimchi fried rice, especially now that I’ve a newborn. Also, it’s got vegetables in it. Pre-chopped frozen vegetables, so you don’t have to chop stuff up. Vegetables are important. If you can only get one meal a day together, it might as well have vegetables.

Before you start–spoon out some rice from rice cooker. It’s best if you use some cold cooked rice from the day previous, but if you can’t have that, take the rice out of the rice cooker and put it in a large bowl to let off some steam and cool off before you fire up the wok/frying pan. Take out quite a big spoonfuls–like, as much cooked rice you could hold in your hands and then some.

And then…here’s the recipe

INGREDIENTS (you will need a big wok or the biggest nonstick frying pan you’ve got–if it’s a deep frying pan, all the better):

  • Big heaping pile of cooled, cooked rice. 5-6 cups, cooked.
  • 2-4 tablespoons cooking oil (corn/canola is fine)
  • handful of chopped pancetta (optional)
  • 3-4 eggs
  • 1 onion finely chopped (optional)
  • 1 package (about 1 lb) of frozen pre-chopped vegetables like peas + carrots. Or peas + carrots + corn. Whatever you like.
  • 1-2 tablespoons soy sauce
  • 1 tablespoon sesame oil
  • about a cup of cabbage kimchi + juice

DIRECTIONS:
Mix eggs. You don’t have to whip it up a lot. Just make sure the eggs are mixed.

Heat about 1 tablespoon of oil in the frying pan/wok.

(If you want to get fancy, you can saute pre-chopped pancetta and use the oil from the pancetta to scramble the eggs and fry the rice–if so: fry pancetta, then set pancetta aside and use the pancetta fat to cook things. then add pancetta back at the end).

Scramble the eggs lightly (not all the way cooked, but mostly cooked). Put the mostly-cooked eggs in a small bowl (can be the same bowl in which you whisked them), set aside.

In the frying pan/wok, heat up the remaining oil. Put heat on high. Add onions (optional). Sauté until onions are softened and golden. Add package of frozen veg. Sauté until vegetables are softened.

Add rice to mixture in pan. Mix + Saute for about 5-10 minutes until rice is coated in oil and “sizzling.”

Add the lightly scrambled eggs. (If you’ve cooked pancetta, add the pancetta now). Make sure they get a bit “chopped up” with your wooden spoon or spoonula, or whatever you are using to move stuff around in the pan.

With the heat still up on high, add a splash of soy sauce. Drizzle some sesame oil for flavor.

Add the chopped kimchi + kimchi juice.

Enjoy.

(you an also serve with a lightly fried egg on top).

Easy Dessert: Oreo icebox cake

Oreo icebox cake. Ready to eat.

I had no idea about the wonderful world of icebox cakes. As in, wonderful chilled cakes that require zero baking. Cakes that just involve assembly. That require no cooking. Cakes a five year old could make. Cakes so easy they have me writing incomplete sentences. Fragments. Cookies. Cream. Chill. Done.

So I thought I’d share an icebox cake recipe as part of my series of “quick and easy” meals for new moms or people-who-just-don’t-have-time. I used Cool Whip, because duh, it’s easy. But you can totally throw some whipping cream and sugar together and whip it up if Cool Whip is not your thing and/or if you’ve got a few more minutes and the werewithal to wash a few more dishes.

I’m not even going to put an official recipe here–because it’s really assembly.

Get your Cool Whip (or whipping cream) out. Pour out about 1/4 – 1/2 glass of milk (a big glug or two) into a shallow small bowl. Get yourself a big package of Oreos. (the package you see here made a very small cake about 6 inches in diameter (3 oreo cookies wide). You’ll want more Cool Whip and more Oreos if you want a bigger cake.
Icebox cake

See the baby rice cereal? I’m keeping it real in the above picture…(Also, I changed my mind on the Oreo icebox cake container, and switched to a clear glass pyrex dish).

Then start assembly. Dunk an Oreo and set it down into the cake container (I used a glass pyrex dish). Do this until you’ve got the first layer down.

Then dollop some Cool Whip until you’ve got a generous layer covering the Oreos.

Then dunk more Oreos in milk and set down your next layer.

Etcetera, etcetera. I recommend getting yourself at least 3 layers of Oreos down, before you top the whole sucker up with Cool Whip.

Untitled

Cover the Oreos and Cool Whip with aluminum foil and then CHILL in the fridge. And yes, you yourself will have to CHILL, too–while you wait for the flavors in the cake to meld, and for the cookies to get mushy like, well, cake.

I like to cover it 8 hours or overnight, at the very minimum. If you’re using double-stuffed Oreos, you will probably want it to chill for closer to 24 hours, because the cream center is the last to break down.

It is decadent. Simple. Fun.

Try it with other cookies–like graham crackers or lemon cremes!

Oreo cool whip icebox cake ready to refrigerate for 6+ hours!

Quick and Easy Meal: Sriracha Sloppy Joes

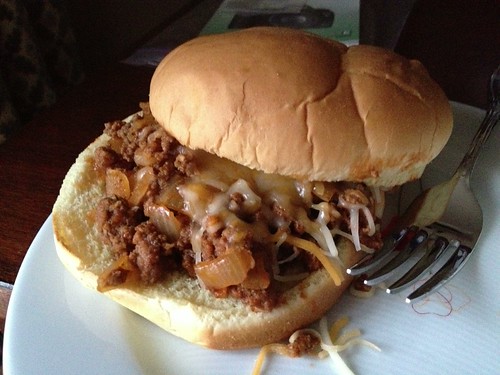
Sriracha Sloppy joes

The idea of making sloppy joes intrigued me, because the last time I had sloppy joes, I was nibbling them off a lunch tray in the multipurpose room at school. At elementary school. And we never ate them. Or at least, I never did. And neither did my friends. They were gloppy and disgusting.

But you can’t judge a dish when you only know it in the context of the school cafeteria.

And I thought I’d give it another try as an adult, especially since I figured I could whip this up pretty quickly as a new mom. Now I know one of the rules is “no chopping,” but you could skip the onions if you hate them–or you can pick up a package of pre-chopped onions from trader joes. Or you can put your kid in a high chair for about 5 minutes while you chop the onions and put garlic through a garlic press. (Or if you were really desperate like me–yes you can reach for the garlic powder–because when you’ve got a small baby, you can’t sweat the little things like fresh garlic versus powder. You’ve gotta figure out how to make food and EAT).

I looked up a few sloppy joe recipes, with the intention of finding one that was simple and quick. And then I decided to give it an extra kick with not the more traditional tabasco, but Sriracha. It was tremendous. Hope you enjoy. Recipe after the jump!

Continue reading

Easy Meal: Chicken Marbella

Chicken marbella

This is an amazing recipe out of the Silver Palate Cookbook–it’s one of those dishes that I can’t believe I waited so long to try. If dishes could be icons, this would be an icon–there are no imitations, it has stood the test of time, and everyone who’s tasted it, loves it.

I made it for the first time last year, wondering how on earth the ingredients would meld together. I mean really–capers, olives, prunes? But I was game; so many people rave about this recipe, I didn’t dare balk.

And it was amazing–such an easy to dish to make, with results that belie its simplicity. It immediately went into my meal rotation.

So when I had a baby, chicken marbella was one of the first meals I got together. It does take some time, as you need to marinate the ingredients overnight or at least 8 hours, but prep and cooking are straightforward and easy: throw everything into a ziploc bag with a bunch of chicken thighs, kind of shake/mash the bag so all the ingredients are mixed up together, and then stick the bag of chicken in the fridge overnight. The next day/evening, empty out the bag into a baking pan, top with brown sugar and add white wine, and pop into an oven.

No chopping. No open flames. And if you’ve got a rice cooker, you’ve got an easy mechanism with which to serve the chicken. It tastes great atop basmati rice.

Great also to send over to a new mom, too. 😉

Recipe after the jump…

Continue reading

Quick and Easy Meal: stovetop lasagna

Bowtie lasagna

Another Quick and Easy Meal for new mothers/beginning cooks/harried-people-with-no-time-but-desire-for-a-hot-meal…

This meal made my husband’s eyes light up (we were in dire need of a home cooked meal). It makes both my meat-lover husband and pasta-carb-loving me, satisfied; my husband is not the kind of man who takes seconds of pasta dishes, but I caught him going for seconds, immediately. And then eating the leftovers the next day. We made this TWICE in the same week, it’s that simple and filling.

It takes about 15 minutes to cook–and even if you don’t time everything perfectly, the prep (what prep? there’s pretty much zero prep) and cook time is definitely under 30 minutes. There is no chopping involved, and minimal sautéing (aka exposure to spluttering oil). Again, I was able to cook this meal in its entirety with my 5 month old in a sling. Yes, even the past-draining part, because what I did was scoop out the pasta into a big bowl, drained the pot, and then scooped the pasta back into the pot. You could also set the baby down for about a minute while doing this step. And if you’re using a big-enough skillet/frying pan for the meat, you can just scoop the pasta into the pan holding the meat. This isn’t baking, so you can fudge quite a bit.

I think you could dress this up as you please–add some chopped black olives or a dash of red chili peppers or parmesan or whatever else you like in your pasta or lasagna. Make it your own!

INGREDIENTS:

  • 1 lb ground beef
  • 1 box (16 oz) bowtie farfalle pasta (or rigatoni)
  • 1 jar (3 cups) spaghetti sauce or marinara sauce
  • 2 Tbsp olive oil
  • salt
  • 1 tsp garlic powder
  • 1 tsp oregano
  • 1 Tbsp basil
  • 2/3 cup shredded mozzarella cheese
  • 1/2 cup sour cream

MATERIALS:

  • 1 skillet/frying pan
  • 1 dutch oven/chef’s pan
  • optional: colander
  • wooden spoon for stirring

DIRECTIONS:
Salt and boil water in a dutch oven (enough to cook a box of pasta). When water comes to a boil, add pasta (farfalle takes about 11 minutes to cook).

Heat up about a tablespoon of olive oil in a frying pan. Add ground beef. Add a dash of salt (about 1-2 tsp) in the beef. Cook until meat is browned. Set aside unti noodles are cooked through.

When noodles are cooked, drain water (either with a lid on the pot and tipping the pot to drain–or drain in a colander and then put the pasta back into the pot–or scoop it out with something like a Chinese spider utensil, drain the pot, and then scoop the pasta back into the pot).

Start adding things to the pot of cooked pasta:
Add the ground beef.
Add garlic powder, basil, and oregano.
Add spaghetti sauce.
Add sour cream.
Add cheese.

On low heat, mix up all the items, until the cheese is melted.

DONE. This makes a healthy amount of pasta–so you’ll have enough for leftovers and meals the next day (always a good thing for new mothers).

Quick and Easy Meal: Baked French Toast

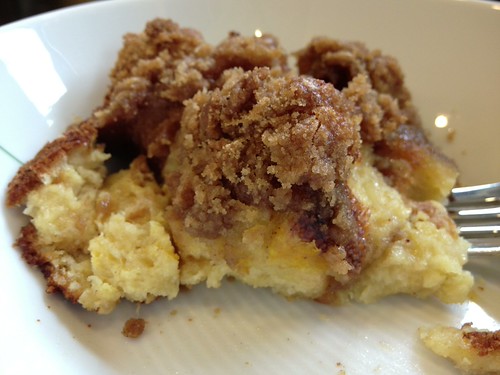
Baked French toast

Since breakfast is the first meal of the day, I thought I’d put up a recipe for baked french toast as my first Quick and Easy Meal post.

I love breakfasts on weekend mornings, but it’s pretty hard to cook breakfast with a baby attached to you in a sling. Breakfast involves tending to things that are sputtering in oil and butter on a stove top. Things like bacon and eggs and pancakes and french toast that you can’t readily leave to soothe a crying baby–and things that would potentially scald your kid. Nisht gut.

So when I woke up this morning craving french toast, I wondered how I would pull it off. I could put the baby in her high chair and make french toast as quickly as I could (so far, she’s happy for about 15 minutes in the high chair–and after that, all bets are off–she’s known to sit in her high chair for 30 minutes, but she’s also known to scream her head off after 15 minutes, announcing that she is Done With The High Chair Pick Me Up, Dammit).

Orrrr I could bake a french toast casserole. I figured it could be the best of bread pudding and french toast worlds. There’s no required knife work, everything is mix and combine, and the most dangerous part of the whole deal is taking the dish out of the oven. But you can ask someone to take it out for you, or set the baby down for an entire 20 seconds while you do so.

So in sum: no knife work, no open flames. Quick prep. Easy bake. I made the whole thing with my kid in a sling.

It was absolutely simple to cook, and I think you could even prep the whole thing the night before and then just pop it into the oven when you wake up. My husband, who loves custardy french toast, thought this was good. And if you top it with a sugar and butter topping before baking, I think you could even go without the maple syrup. 😉

Recipe follows after the jump…

Continue reading

Quick and Easy Motherhood Meals (aka welcome to motherhood)

Untitled

I had a baby recently. About five months ago, in fact. And what used to be a life filled with elaborate desserts and meals is now a desperate struggle to get food on the table. In our first few months of parenthood, we’ve had our fair share of McDonald’s, delivery food, and sandwiches, so I’m now raring to get hot, home cooked food on the table and in my belly.

But I’ve a few challenges now: I’m either fighting time (baby might wake up from a nap or scream to be picked up) or negotiating safety (baby is in a sling on my body). And I can’t be babysitting a dish on the stove, because well, I’m actually babysitting. (I’ve ruined many a batch of rice while failing to watch the stove and so I finally bought a rice cooker–and it has made a huge difference).

So I’ve been turning to Quick Cook, Easy Prep Motherhood Meals–which are either adaptations on old favorites of mine or recipes I’ve encountered.

The criteria for my Quick and Easy Meals (QEMs) are such:

  • Any knife work has to be minimal (I have decent knife skills, but even then I can’t be chopping for longer than 15 minutes). I can’t chop with my baby on my body, and I don’t know if I have longer than 15 uninterrupted minutes at any one point in my day as a new mom. I have been making good use of pre-prepped salad lettuces these days.

  • Meal prep has to be simple (not a lot of dishes used up, again not a lot of chopping, no fancy gear that I then have to wash).
  • Cooking time is preferably very short or if long, very straightforward (i.e., stick in oven for an hour or simmer on very low heat for an hour). Basically, nothing I must have to guard/watch. There will be no caramels for my QEMs.

Also, these recipes will be reported on this blog under time crunch, too–so forgive the slapdash nature of the posts. Right now, the baby is napping–so who knows how long I have to finish this post? But I thought I’d post them here so I can look them up easily for my own purposes–and so I could share them with you; when I asked my Facebook friends if there would be any interest in such recipes, I got such an enthusiastic response, I thought I’d revive this food blog. 🙂

And no–you don’t have to be a mom to appreciate these recipes. Anyone who doesn’t have a lot of time and doesn’t want to do a bunch of work to get food on the table would enjoy this, whether you are a beginning cook, have come home after a long workday and aren’t up for making beef wellington, or someone who’s got a kid strapped to them and is freaked out about cooking and slicing/burning their baby.

Stay tuned. I’ve already got a couple recipes to share, like quick stovetop lasagna, baked french toast, and of course, the ever awesome classic, chicken marbella.

Miyuk Gook aka Seaweed Soup aka Korean Postpartum Soup aka Birthday Soup

Miyuk gook/seaweed soup!

I like to imagine the first time someone looked at a bunch of kelp on a beach and decided to boil a big pot of soup with said clump of seaweed. Maybe someone really hungry. Or someone really creative. Or totally broke. Or all of the above. And rejoicing in its deliciousness and reveling in its health benefits, converting all others to do the same.

Over the years, this soup has taken on different variations (made with fish stock, beef stock, chicken stock, anchovies, with tofu or not, etc), but it’s had a central role in celebrating milestones in Korean lives. And over the years, I’ve often been found eyeing a clump of seaweed on a California beach and thinking about taking it home to eat. Ha.

High in vitamin A, C, iron, and calcium, miyuk gook is served to women after giving birth. It is *the* Korean postpartum food, and you’re supposed to eat it, and only it, for 3-4 straight weeks. So it’s basically your first birthday food, because your birth mom has  theoretically had some on your birthday. My mom has always served me noodles for long life on my birthdays, but many other Korean kids eat miyuk gook on their birthday, too.

I’ve always loved this soup; I’ve never needed the excuse of pregnancy or a birthday to down a nice bowl of seaweed and broth. But here I am–cooking up large batches of the stuff now that I’m due anyday.

You can buy the kelp in either dried or fresh format. I usually buy the dried kind (if you buy the wet kind in the refrigerated section, you’ll want to wash and drain it so that it’s not so salty). Pictured here is a bag of dried kelp:

Dried seaweed

A little seaweed goes a long way. You’ll want to grab a handful and reconstitute it in water, where it will expand and rehydrate into a large mass of seaweed. You’ll also want to cut it up with scissors or chop it with a knife into more wieldy pieces so that when you go to eat the seaweed soup, you won’t have to chew on a seaweed piece the size of your face.

See the bowl of seaweed below? That was about a handful of dried seaweed before soaking in water for about 10-15 minutes. I’m not kidding about how much it expands.

Prepped

Like I said, there are various meats and stocks you can use. In the past, I’ve used dried anchovies, but my favorite is to use a few short ribs. Because uh, I love short ribs. You’ll see that I’ve scored the short ribs. Better to eat with, my dear!

Also good to add are garlic and green onions. And if you’re so inclined, some sliced tofu.

For the record, my favorite tofu is Pulmuone brand, which I’ve only been able to find in Korean stores. If I can’t find Pulmuone, I tend to pass on the tofu as an ingredient in this soup.

My Fave tofu

After prepping your ingredients, heat up a tablespoon or two of vegetable oil in a dutch oven or soup pot. And add the garlic and green onions until they soften. Then add your meat until it browns (if you’re using dried anchovies, no need to brown the anchovies).

Sauté

Then add water. About 6-9 cups. Or whatever your soup pot’s capacity might be. Add the rehydrated seaweed and optional tofu.

Bring to a boil and then simmer.

Add a teaspoon of sesame oil (if you don’t have it, it’s not a dealbreaker, but it’s a nice flavor). Add a tablespoon of soy sauce (if you don’t have soy sauce, you can add some salt–but be careful not to over salt the soup).

This is what the soup looks like after about half an hour of simmering:

Miyuk gook after 30 min of simmering.

Add some black pepper. Serve with rice. Live long and prosper.

Recipe after the jump…

Continue reading